The solution does have the capabilities to make full and incremental load with multi-threading using a modular approach.
In the future, you can use the same ADF solution in Azure synapse.
In the following solution, we are loading the data from the Azure data lake to the Azure SQL (Physically) using the Azure Data Factory, We make customization to generate the table's constraint to make sure that we will have the same performance at Azure SQL.
Following are the step that helps you to incorporate the provided solution in your implementation.
The solution has 3 parts including its source code.
- D365FO
- SQL Server
- Azure Data Factory
D365FO
As a first step, you need to configure the Azure data lake with Dynamics 365 Finance & Operations Link.
Once the data lake is configured successfully, then please import our customization package, you can download the file using this link, and additional link.
After successful Import, please create the menu item for [AVIBlobStorageAccount] form, and set the navigation of the form according to your easiness.
As a pre-requisite, please navigate to that form, and provide the following information.
- DataLake Storage Account Name.
- Account key for access.
- Click on data lake to enable the checkbox.
Reference screenshot
All the above information will be utilized by our customization to generate and upload the file to the Azure Data Lake container.
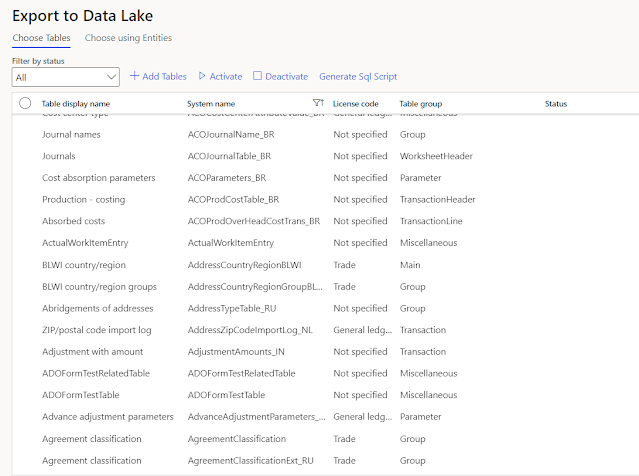
Once all the prerequisites are completed, then activate your required tables.
Reference screenshot.
Once all tables are in a running state then select all of them, and click on the highlighted menu item.
This is the customization I have done to fulfill my requirements to have the schema of a complete table including primary keys and indexes.
The second step of the activity will generate the CSV file that will be used in Azure Data Factory and will have the complete folder hierarchy path against every table
Reference screenshot
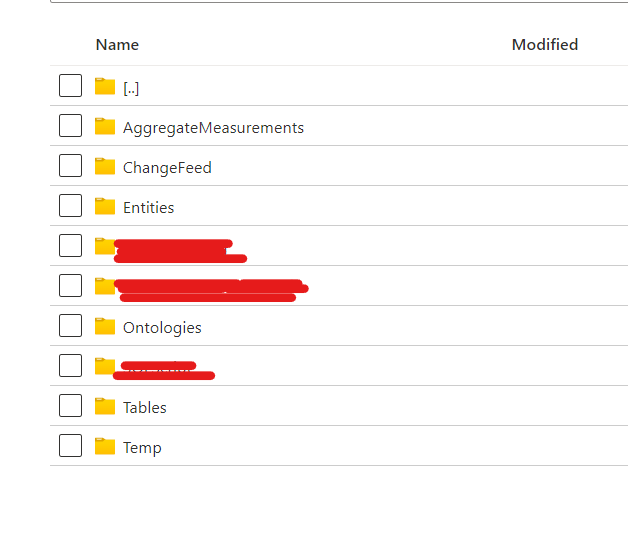
Before execution of our customization, you will see the following OOTB folders in your data lake. Please execute the customization in batch mode.
Reference screenshot
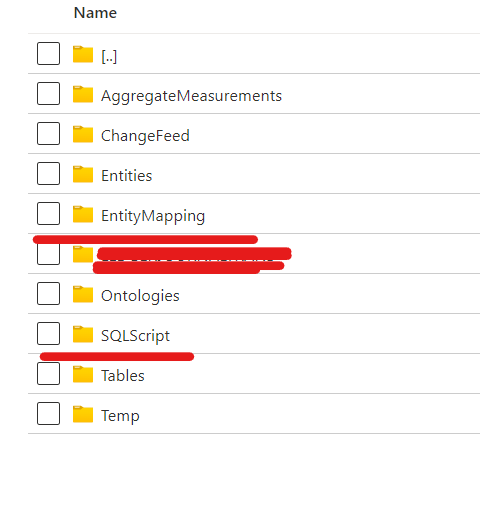
After execution of our customization, You will see two additional folders.
Reference screenshot.
SQLScript
As I mentioned earlier that the folder contains the SQL table schema that will be used by the Azure data factory to create the tables on runtime if doesn't exist.
File preview
EntityMapping
The entity mapping file will also be used by the Azure data factory for reading the CSV file using a common data model connector.
File preview
Now the Dynamics 365 Finance & Operations side activities are completed.
Let's jump to the next step.
SQL Server
At the SQL server-side, we have only the following 3 steps.
- Create Azure SQL database
- Create a new Schema with the Name of [DL], as it is being used in our complete solution.
- Create the following Store procedure in your database. You can download the store procedure using this link.
Important
- As we are using Data flow with a Common data connector that doesn't support the self-hosted integration runtime, so please use the Azure integration runtime.
- Some Dimension-related tables have an index on the Hash key, and Microsoft doesn't export the Hash information, so you need to disable those indexes manually otherwise may face the index violation issue.
I would recommend having a look at the store procedure for technical understanding, You can modify them according to your requirements.
Azure Data Factory
I would recommend having a look at the prerequisite and completing them before importing our Azure Data Factory source code as a template by using this link.
Pre-Requisite
Linked Services.
Create two linked services in your Azure data factory. One for Azure SQL communication, and the Second for Azure data lake communication via Azure Data Factory.
Now, You can import the Azure Data factory template to your data factory.
Process Flow Diagram
Below is the Azure data factory flow diagram that will be used in both types of data load (Full & incremental)
Steps
In the first step, the pipeline sets the current execution time into a variable.
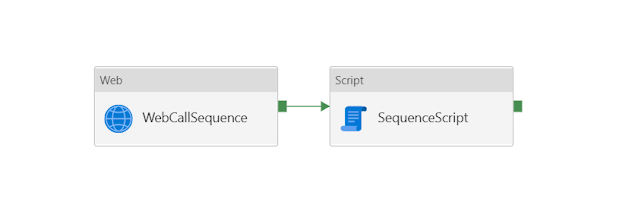
In the second step, a separate activity "SequencePipeLine" is called within the main activity.
SequencePipeLine
In the sequence pipeline activity, the azure data factory loads the file of sequences from the data lake (from the SQLScript folder) that is being used in all schema tables and will generate them into the SQL database.
In the third step, another separate activity "SQLDatabaseSchema" is called within the main activity.
SQLDatabaseSchema
In the Database schema pipeline activity, the azure data factory loads the files of tables schema from the data lake (from the SQLScript folder) and will create the table, keys, and indexes if not exists database.
The [EntitiesDictionary] part is calling a store procedure that will create two additional tables in your database and load one of them with all the table's names and with the default last sync date 01-01-1900.
The Last part of this pipeline will load the manifest parameter file from the Azure data lake to your database that we generated during D365FO activities.
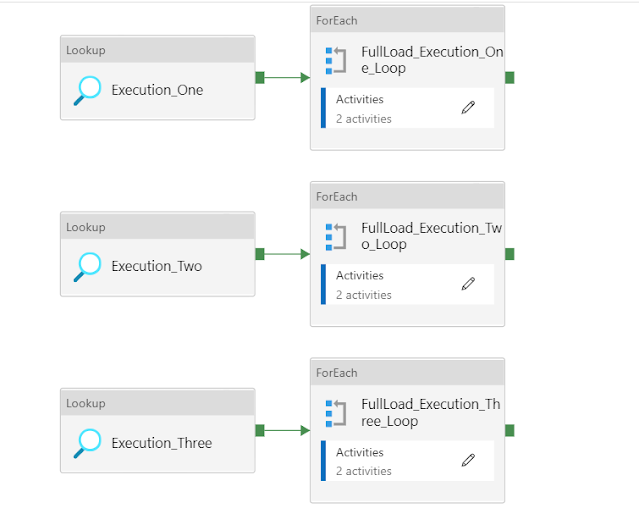
In the next step, the main activity executing two parallel pipelines [FullLoadPipeLine] & [IncrementalPipeLine].
FullLoadPipeLine & IncrementalPipeLine
In both pipelines, three parallel activities are called, and all of them are calling the store procedure based on different parameter values and processing the different sets of tables.
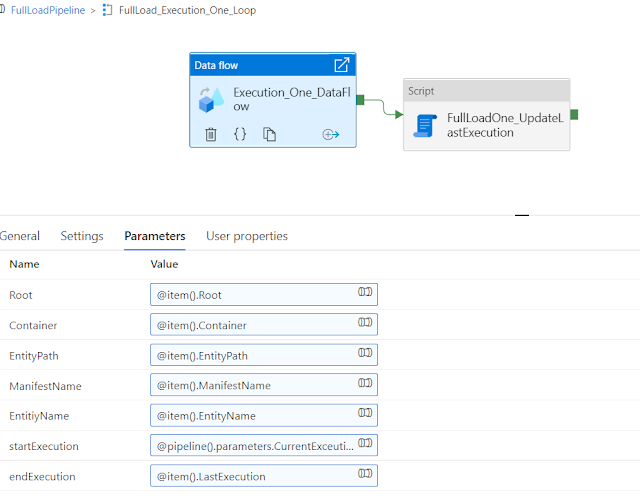
A data flow activity is called in every for each loop activity, the data flow has a few parameters like below that need to provide, and all this information you will get as an object in your for-each loop's iteration.
after the data flow, the next step is to mark the last execution in our directory table.
Let's discuss the data flow here.
We have two separate data flows for full load and for incremental.
In both data flows, we have two additional steps for transformation, derived column, and selection of records, but in the incremental data flow, there are 3 additional steps to manage the change tracking and avoid the duplication of the records.
I would suggest having a look at both data flow for a better understanding.
Reference screenshot of full load data flow
Reference screenshot of incremental load data flowImportant
In this complete solution of the Azure data factory, the following features are not included.
- Retry logic
- The retry logic is important because you can have a connectivity issue for any technical reason.
- Email notification
Downloadable links